Quick and Easy Granola

IMG_3237

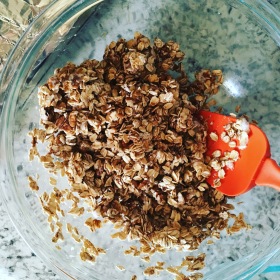
The thing that I love the most about home made granola is that you can add almost anything imaginable to it that you love. You can make it gluten free, you can make it nut free, you can make it sweet, you can make it savory, you can make it ANYTHING you want. That to me is exciting. Did I mention you can make it so that there are extra amounts of those large clumps that are crunchy and always extra delicious? Yeah, that is my absolute favorite part of making it at home. Extra big clumps = extra smiles.

So I made some granola the other day, just with what I had on hand… Gluten free oats, pecans, cinnamon, honey and a touch of brown sugar. Nothing really fancy, but it turned out so good! I wanted to share it on here so that any of you at home can make it using whatever your favorite ingredients are. This would be so good with some flakes of unsweetened coconut or some raisins. Don’t be shocked by how easy it is….

Extra Crunchy Granola                            20mins

  • 4 cups rolled oats
  • 1 cup your favorite nuts
  • 1 teaspoon salt
  • 3 Tablespoons honey
  • 1 Tablespoon Brown Sugar (or to desired sweetness)
  • Desired amount of cinnamon (or other spice)
  • One Egg white, Whipped until light and frothy

Preheat oven to 320*F

In a large bowl add your oats, nuts, salt, and cinnamon (other spices).

Heat honey slightly in microwave for 5-10 seconds just until it thins, then add in brown sugar and pour over oat and nut mixture, stir to coat.

Beat your egg until it has soft peaks and gently fold into the nut and oat mixture. This is what makes the big clumps, so do not over mix it!

IMG_3232

Gently distribute onto a foil lined baking sheet and bake for 10 minutes, gently stir and then bake for another 10-12 minutes.

 IMG_3238

Allow to completely cool and then store in an airtight container for up to 3 weeks.


Oatmeal Cream Pies

IMG_1797

When you hear oatmeal cream pie childhood memories of Little Debbie probably pops into your head. I always remember loving these, but unfortunately when I retried them as an adult they were sickeningly sugary and lacked overall flavor (sorry, Little Debbie!). Now, as hard as it may be, erase that memory… because these are absolutely nothing like those. These are thin crisp and slightly spicy oatmeal cookies, filled with fresh, smooth buttercream that can be any flavor you want. They are great at room temperature, cold from the fridge and can be kept in an air tight container in the freezer for a couple months! These have been a favorite of my family, but also people in my town that visited the farmers market last year.IMG_1785

This recipe is gluten free and could easily be made dairy free if you make an alternative buttercream. I am excited to share it with everyone and can’t wait for you to try your hand at making them! This recipe makes about 15 cream pies (30 cookies), it doubles beautifully if you have an occasion that you need to make more for. IMG_1796

Oatmeal Cream Pies (Makes 15 cream pies)    Oatmeal Cream Pies PDF

  • 1/2 Cup Vegetable Shortening
  • 1/2 Cup packed Brown Sugar
  • 1/2 Cup Granulated sugar
  • 1 egg
  • 1/2 teaspoon Salt
  • 1/2 teaspoon baking soda
  • 5 Tablespoons Almond flour *
  • 1/4 teaspoon cinnamon
  • 1/4 teaspoon ginger
  • 1/4 teaspoon cloves
  • 1/4 teaspoon allspice
  • 1 1/2 cups Gluten free rolled oats

Cream together sugars and vegetable shortening. Add in the egg and beat again, just until incorporated.

Add in salt, baking soda, almond flour and spices and stir until fully combined. Then stir in the oats.

Drop by scant teaspoonfuls onto parchment lined baking sheet leaving room for them to spread. Bake at 325*F for 8-12 minutes. Keep an eye on them, they get overdone very quickly. When you take them out lift them off the pan ( just lift the entire paper)  and allow them to cool completely on a wire rack before filling.

*If you do not have Almond flour, I have also ground some of the extra oats into a flour and used them in place.

Buttercream Filling                                                          Buttercream Filling PDF

  • 1/4 cup Vegetable shortening
  • 1/4 cup (1/2 stick) room temperature butter
  • 1 teaspoon vanilla extract
  • 2-3 cups powder sugar
  • 2 Tablespoons heavy cream OR milk

Cream together butter, shortening and vanilla extract. Add in powdered sugar one cup at a time, check consistency after two cups, if not at desired thickness add a little more powdered sugar. Add in 1-2 Tablespoon of cream/milk and cream together, beat for 4-5 minutes for super smooth and fluffy buttercream.

Happy Baking!

-B

Third Year Date-aversary

February 8th. A beautiful date to me. The date that I started dating the man of my dreams. This anniversary I wanted to do something special for him, I wasn’t really very sure what to do or make but I knew I wanted it to be something he loves. Then it came to me… He loves confetti cake. So I decided to make him mini confetti cake.

Enjoy the pictures…. and as always, Happy baking! 🙂


Chocolatey Chip Brownies

image.jpeg
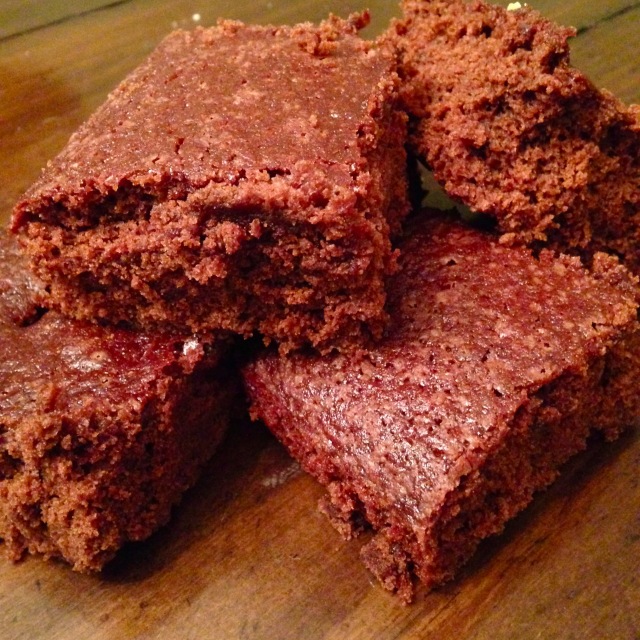
So, these brownies are really really easy, actually the easiest recipe I have made, ever! I made them while we were having our blizzard this weekend, they definitely gave me my chocolate fix!

There is really not much to say about these, the simple deliciousness of chocolatey chip brownies does all the talking for me, so read on and make these soon. Especially with Valentines day is coming up… Making these bite-sized in a muffin pan for you love would be uber cute ;).

Chocolatey Chip Brownies

1 Cup +2 Tablespoons All purpose flour

2/3 Cup granulated sugar

2/3 Cup packed Brown Sugar

1 Tablespoon baking powder

1/3 cup Cocoa powder

1/2-1 Cup chocolate chips (i eyeball the amount here. I like lots of choc.chips)

2 eggs

1/4 cup water

2/3 cup Oil

1 teaspoon Vanilla extract

•Preheat oven to 350*F

•Combine dry ingredients in a large bowl.

•Add in remaining wet ingredietns and mix thoroughly.

•Pour batter into a lightly greased  8×8 or 9×9 inch baking pan and bake for 30-40 minutes.

happy baking!

-B

Memaw’s Candied Pecans

IMG_0856

Everyone has those recipes they go back to that bring back memories of places, people and moments that were filled with all things wonderful. This is one of mine. I have several of my Memaw’s recipes that were handed down to me and there are definitely a few that stand out the most. One of them is a fantastic oyster cracker recipe that is super easy and she would make before we would embark on our road trips, and then there is her candied pecan recipe. I do not remember her making this one as much when I was little, but I do remember having them in a snowflake  jar on her counter around Christmas time and stealing them while she wasn’t looking because they are just that amazingly delicious!

IMG_0858

When I made these this morning it took me no longer than 40 minutes to whip them up, cool and package them. They are making their way into some special people’s goody bags this Christmas.

Memaw’s Candied Pecans

1 pound pecan halves

2 egg whites

1 cup sugar

1/2 stick butter

1 teaspoon Vanilla extract

2 Tablespoons water

Heat oven to 325*

  1. Place egg whites in a bowl and whisk until slightly frothy. Add in sugar and teaspoon of vanilla extract and stir vigorously to combine (mixture will be grainy). Then add in your 2 tablespoons of water and stir until combined.
  2. Place butter on a cookie sheet and place in the oven to melt, careful not to burn.
  3. Stir in pecan halves into egg mixture until coated. then spoon onto the baking sheet with melted butter and stir gently.
  4. Bake for approximately 30 minutes, stirring every 10 to keep them from burning.
  5. Cool on a paper towel.

Enjoy!


Happy Baking! (and, a very merry Christmas!)

Bailey

Quick and Easy Apple Pie Filling (crock pot method)

We used this super simple method of making apple pie filling last weekend for the harvest celebration at chippokes (which by the way, was amazing… If you missed it, I feel bad for you). But we started this early in the morning when we got up and in just a few hours it was ready for serving. We served it on top of plain cheesecake, which I didn’t get to try, but it definitely looked amazing! The apples are sweet with a lighter cinnamon flavor. Use any of your favorite apples, we used gala apples and they held up to the heat very nicely.

Crock Pot Apple Pie Filling

2 cups warm water

1/2 cup corn starch

6 cups diced apples

1 cup sugar (a little more if using tart apples)

1/2 teaspoon ground nutmeg

1/2 teaspoon ground cloves

1 teaspoon ground cinnamon

2 Tablespoons lemon juice

Combine warm water and corn starch in crock pot with a wire whisk. Whisk until no lumps remain.

Add the remaining ingredients and stir to combine. Set your crock pot to low for 4 hours. 

Enjoy!

Chippokes Harvest Celebration October 17th, 11am-6pm

I am so excited to be participating as a vendor at this years Harvest Celebration at Chippokes Plantation State Park! Come and see me and get some pumpkin cheesecake, oatmeal creampies, chocolate chip cookies, molasses cookies, snickerdoodle blondies, peanut butter brownies, honey apple cake or  plain cheesecake with a choice of toppings!

Now accepting several major credit card through Paypal Here!

I am proud to announce that i can now accept Visa, Mastercard, discover and American express credit cards as well as payment through a paypal account through paypal here!

It was free to set up and download the app and they sent me the card reader for my smart phone for free as well. I couldn’t be more excited!

Stamped Fondant Tiles: How To

I made these to go on a wedding cake that I did over the weekend. They took a little time between steps, but overall I thought that they were really easy to do. I will definitely be doing them again!

To get started you need fondant of your choice color (mine was white) and roll it out thin. I cut my ’tiles’ out before stamping them, but if I do it again, I think I would stamp and then cut… I will have to try it out and give you guys an update.
IMG_9950 I used a mixture of food coloring, water and powdered sugar for the stamping. I mixed it up fairly thick so that it would evenly coat the stamp. I found with just using a water/color mixture it beaded up on the surface of the fondant which was definitely not what I wanted! Looking back at this I think I would also substitute vodka or an other strong alcohol for the liquid to speed up the drying time. Wash a clean unused stamp and dry. Then just brush on your color mixture with a clean unused paint brush. It stamped fairly evenly on most of them. The only problem I ran into was that some of my fondant had small dips in it from where it wasn’t rolled out super evenly, I liked the way that it looked slightly varrigated.IMG_9961After the color dried they were ready to put on the cake! You could put it on cookies, do rounds and put them on top of cupcakes, there are so many options to use these!

IMG_9960

Happy Baking! -B

Will’s Zombie Birthday cake

Made a cute zombie cake for a young boys birthday over the weekend. Got to practice my blood making skills (ewwwwwwie). But seriously, this stuff was AWESOME! It made a bright red pipe-able (is that a word?) gel and it did not take any special ingredients whatsoever. Mine dried to the consistency of jello, however, you could make it thinner for blood spatters (eww) or let it set some before piping to give it a different consistency overall.  I will share the recipe below though so you can make your own awesome cakes with this gel. It could be used for other things as well like blue for water!

 IMG_9823

Piping Gel Recipe

1/4 cup white corn syrup

1/4 cup water

3-4 Tablespoons corn starch (more or less depending on what you are using it for, I used 3 Tbsp + 1 tsp and it dried/cooled really thick like jello)

Stir together ingredients in a microwavable bowl. Heat for 1 minute and 30 seconds or until mixture boils. Remove from microwave and stir with a whisk. Add desired colors!

You can also add in some vanilla or other flavor if desired.

Happy Baking!

-B